The Yum Forest Gets A Herb Garden

Have I mentioned I love plants? That I want to grow food, gardens, and plants year long? How I want to plant once and all plants will grow year after year? I live in Canada. Garden Zone 5B. I had no idea perennial herbs were an option in my garden zone. It turns out there are quite a few. Alas, not the best herb in the world – basil. But there are A LOT. A quick Google search brought up a list that surprised me: Lavender, Chives, Oregano, Sage, Thyme, Rosemary, Tarragon, Mint, Chamomile, Cilantro, Dill, Parsley, and more.

I don’t know how accurate this list is as I was told at the greenhouse I bought the dill from, that dill was an annual. Maybe there are different kinds of dill? Some more winter hardy? Plants are expensive and I don’t want to spend a lot of money every year on tons of plants. I get perennials. Plant once and you’re good to go – set it and forget it. I have tried planting indoor herbs, I am not an attentive enough gardener to keep indoor herbs alive. These plants do much better for me outdoors.

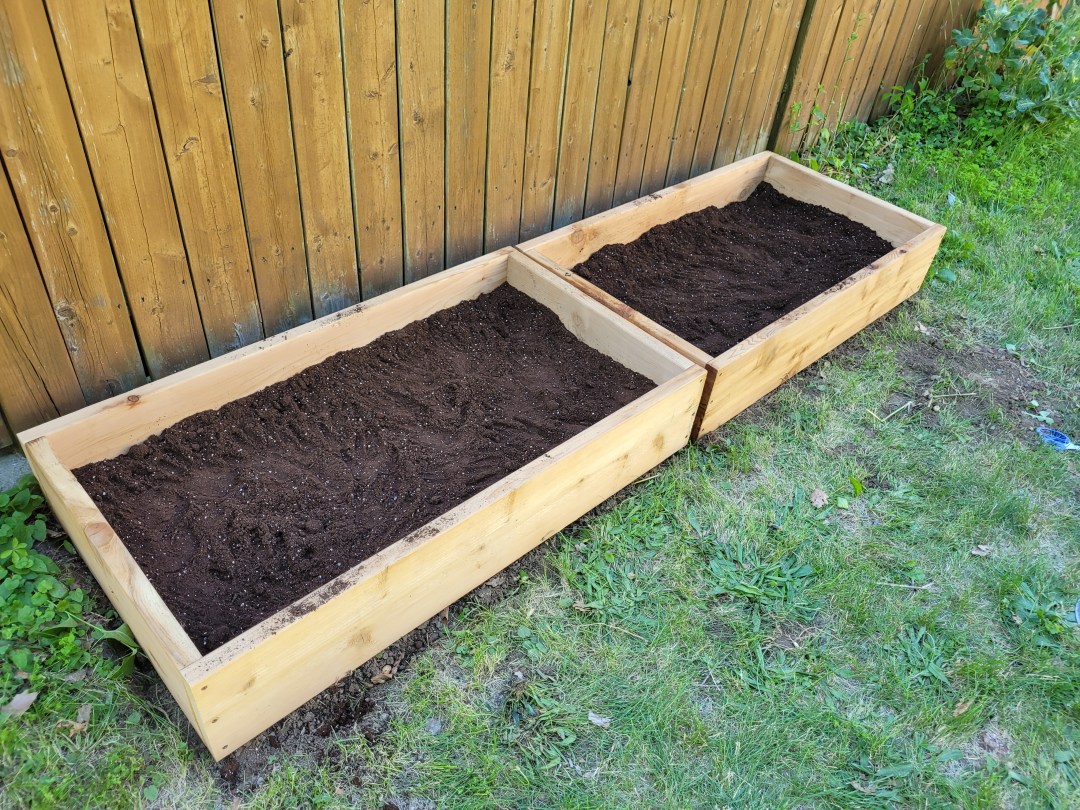
It was time to build a herb garden! I went to Home Hardware and managed to get a great price on end cuts of cedar. The wood was tall enough that I would only need to make it one board high, but not very long, so I built two herb gardens side by side.

It was hot as balls out and I had to level out the ground before I could fill it with dirt. I used newspaper and cardboard to help with future weeds. These gardens aren’t held in place with stakes and don’t have a bottom. I haven’t had them long enough to know if a storm, or heavy rain will make all the soil leak out the bottom, or if Winter will shift them out of place. For now they are doing fine.

I have filled them with a combination of herbs and seeds:
-Oregano
-Sage
-Thyme
-Chives
-Tarragon
-Chamomile
-Fennel
-Dill
-Parsley
-Basil

I didn’t have enough plants and seeds to completely fill the herb garden, so I added some other plants that I like to call grocery store gardening. My mango tree was doing really poorly in the flower garden and I replanted it here (right side garden on the front far right). I’m hoping it perks up. I’d be so sad if it died, it’s on its second season. I planted a ton of lemon seeds, a couple blueberries, and kumato tomatoes. There’s a bit more space to add more. I’m torn between rosemary and cilantro. I can get cilantro for $0.99 at the grocery store right now – that likely is the deciding factor!

Are these truly perennials? Time will tell. If you want to see the garden being made in a video, it will be posted below:

The Tea Garden’s Progress

A couple years ago we started a garden – a big one. I’ve always dreamed of having a garden. The weeds were winning the battle for the lawn. We don’t use sprays, we have fruiting plants that we love to harvest and also – the critters! We have so many critters! Chipmunks, birds, salamanders, insects, toads, snakes, and so much more.

I wish I had pics before we started. My old computer with all the photos crashed and they’re gone. The video starts more mid-progress. Hauling all that sod out was hard hard work. I had regret starting the project, it was such hard work. We did it all manually. Shovelling and hauling sod. Shovelful after shovel full. Once the hard part was done, it was much more enjoyable. We put stone blocks in at the very end of the season (it was much more affordable this way). We spent a lot of time pounding rocks to make them level. They’re a bit more wonky this year after the winter, but nothing I’m stressing over. It won’t be too hard to put them back into place. Gravel was added to form the pathway and the little round area where we’ll be putting a seating area.

There is tons of room for more plants. It’s going to take years to get it full. I’m sticking with perennials. Every year it will be more and more full. Future plans are for lighting: fairy lights, or ground path lights. I haven’t decided. There’s still a lot to do and I love it. I can’t wait to have high tea in the tea garden. I’m sure breakfast and candlelight drinks/dessert in the garden will also be fantastic.

I Made A Thing And I Love It!

I’m not sure how I stumbled on Make Your Own Bird Bath, videos on YouTube, but I did. I watched people make bird baths with cement, plastic totes, and some with large leaves. I didn’t want to chop up my beloved plants, I was going to go with plastic totes, but I wanted a bowl shape, not a rectangle.

I started thinking about some of the things I have around the home I could use. I wanted a large bowl for the bird bath and my Bosu Ball came to mind. It was perfect.

With my spouses help, I covered the Bosu Ball in garbage bags and laid out a couple garbage bags to protect the garage floor. I used a ready made bag of cement that just needed water. I dumped the cement into a bucket adding the water a little at a time until it was the consistency I wanted (I didn’t measure anything). I wish I had taken more photos of the process but I couldn’t find my camera and wanted to get started. The mound in the photo didn’t look like this right away. After piling all the cement onto the garbage bag covered Bosu Ball it was very cracked and I was really nervous because it didn’t seem like enough cement. I had to gently pat the cement pile and slowly the cracks blended together. My spouse also ran a paint brush with a bit of water on it to help smooth it all out until it looked like it does on the photo.

I’m not sure where I got the idea that you can remove it from the mold (mould?) after 48 hours, but I ended up waiting an extra day. I’m glad I did. After 48 hours the cement pile still wasn’t the light colour it is now. It still had dark looking wet patches, even though it felt dry. I was really scared of it cracking when we pried it off the Bosu Ball. The cement layer seemed very thin. If I had more cement I have used it. We had to use a crow bar to pry the cement off the ball and I was worried it would get damaged. I wouldn’t use the Bosu Ball again, even though it turned out so good because they are really expensive. I’m sure there are much better items that I could use that would be less upsetting if they were ruined.

Everything did turn out pretty good and nothing was damaged. I love how it turned out.

There are some issues. Because I used a garbage bag, the creases in the bag went into the cement and made it look like cracks, but that makes it look antique and gives it character. If you aren’t into that look and want to try this, possibly a large bowl piled over with sand would be a better option. Also, if you look closely, you can see pieces of the bag stuck in the cracks that will be super hard to get out.

I’m also not sure if the bowl is water tight. I’ve put a couple buckets of water in it and I’ll check on it tomorrow. I’ll forgive it if it’s not. I love how it turned out even if it ends up being a lawn bowl and not a bird bath.

Here’s a photo of the bowl with my spouses feet for size comparison.